S3 Automatic Image Compression
July 29, 2015
I wanted a system that could automatically apply lossless compression to images uploaded to an S3 bucket. Here’s how it works:
- User uploads a file to the S3 bucket.
- S3 bucket notifications send a messages to SQS.
- Python script monitors the queue for new messages.
- When a new message is received the image file is downloaded locally.
- Local file is compressed with mozjpeg.
- The original S3 file is then replaced with the compressed version.
The code for the Python script is on Github https://github.com/pxg/S3-image-compression.
The motivation behind this project was to experiment with the S3 bucket notification system and Python 3. I wanted to see if working with this system would provide a clean solution for file processing tasks.
I think this solution could be particularly useful to use with a CMS which has the ability to write image files to S3 but doesn’t provide image compression.
##Getting set-up on AWS
The trickiest part of was getting the different components configured on AWS, so I’ve written this guide.
###1. Create S3 Bucket Use the AWS S3 console to create your new bucket. This article has some useful techniques for creating AWS items if you’d prefer to just use the command line.
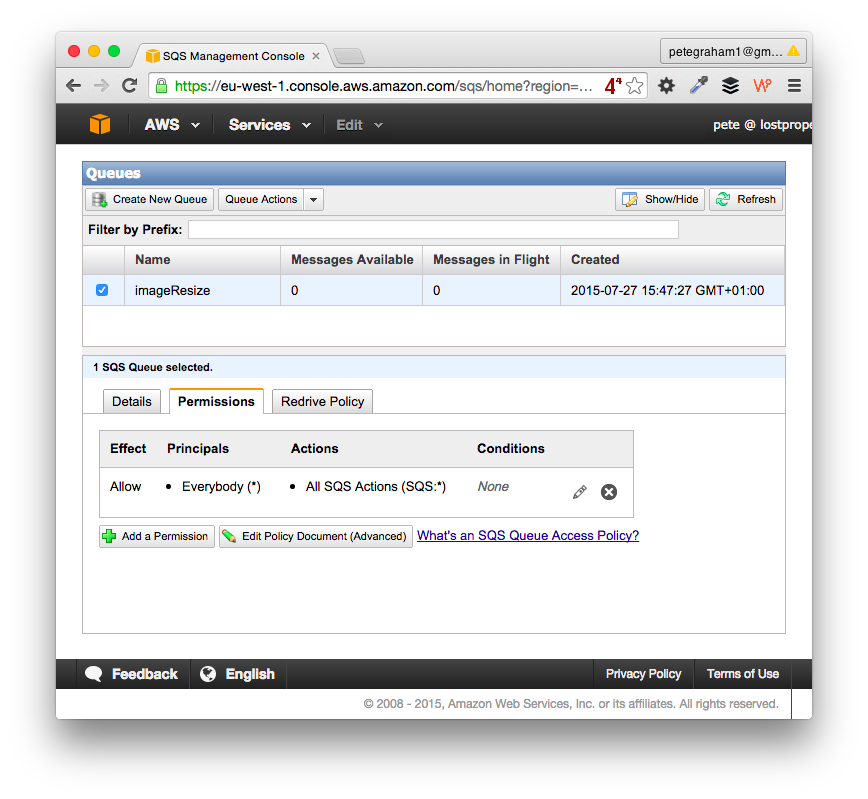
###2. Create an SQS instance Use the AWS SQS console to create a new queue. Next set-up queue’s permissions. The fastest (but least secure) way is to allow “Everybody” and “All SQS Actions”.
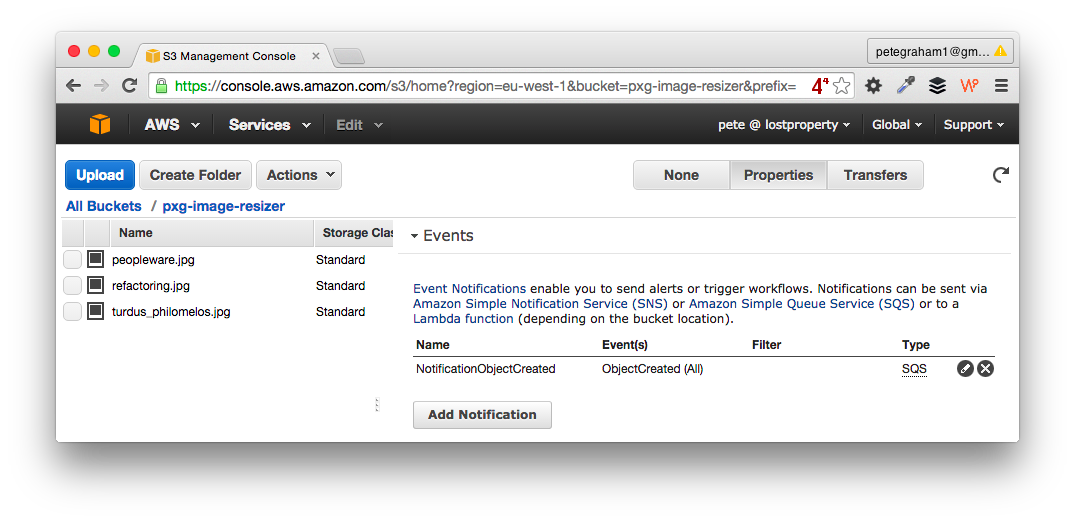
###3. Configure S3 bucket notifications to write to the SQS Go to the AWS S3 console and select your bucket. Next click the properties button on the top right. Look for the Event section and enter:
- Events: ObjectCreated (All)
- SendTo: SQS queue
- SQS Queue: your-queue-name
4. Create an IAM User
Use the AWS user console to create a new IAM user. Next give them write access to the S3 bucket. To do this create a new policy and use the following for the policy document:
{
    "Statement": [
        {
            "Action": "s3:*",
            "Effect": "Allow",
            "Resource": [
                "arn:aws:s3:::your-bucket-name",
                "arn:aws:s3:::ysour-bucket-name/*"
            ]
        }
    ]
}
Of course replace “your-bucket-name” with the real value, you’re using.
###5. Give the User access to read/write SQS The simplest way to do this is attach the policy “AmazonSQSFullAccess” to the user. In a production system you’d want to lock the users access down further.
###6. Give user access to get information about their account The reasons for this will be explained next. You’ll need to add this policy:
{
"Version": "2012-10-17",
"Statement": [
{
"Sid": "Stmt1438081733000",
"Effect": "Allow",
"Action": [
"iam:GetUser"
],
"Resource": [
"arn:aws:iam::239820892130:user/s3-image-resizer"
]
}
]
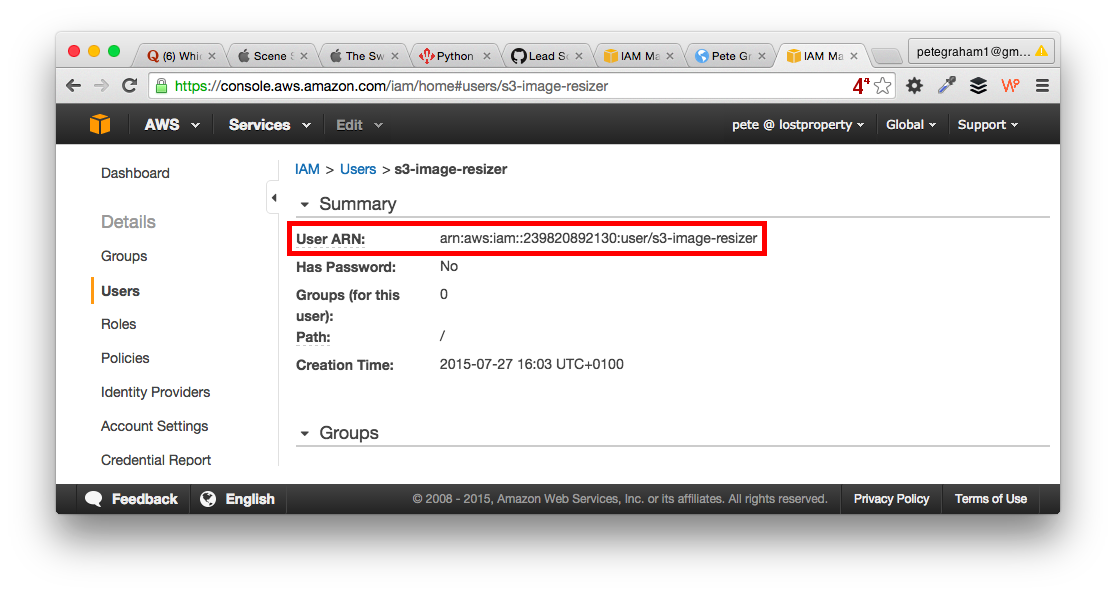
}You’ll need to change the resource to match your user. Thankfully the Users ARN is easy to find. Go to the AWS user console, select your user, the information is in the summary.
###7. Create API Credentials Finally create an access key and secret, then set the credentials as environment variables for the Python script. This is explained further in the README.
##Beware Infinite Notification Loops Notifications are triggered every time a file is updated on S3. Our script monitors for notifications. When we get a notification we compress the associated file and write to S3.
The script gets struck in an infinite loop, as it’s modifying S3 content and therefore triggering notifications. It’s then processing notifications triggered by itself, in a cycle of madness.
##Preventing Infinite Loop Madness
When we receive a notification message about a new or modified file the data looks like this:
{'Records': [{'awsRegion': 'eu-west-1',
              'eventName': 'ObjectCreated:Put',
              'eventSource': 'aws:s3',
              'eventTime': '2015-07-28T10:14:18.255Z',
              'eventVersion': '2.0',
              'requestParameters': {'sourceIPAddress': '37.157.36.218'},
              'responseElements': {'x-amz-id-2': 'lEPwgzy+UXPDRnNCBmHfOzOKtnIJ9ykyvA+MYJwOcsNQrfWjk27xoY2HjMzIpt6TGr6DnW+NBhY=',
                                   'x-amz-request-id': 'B47FEE01041AE73D'},
              's3': {'bucket': {'arn': 'arn:aws:s3:::pxg-image-resizer',
                                'name': 'pxg-image-resizer',
                                'ownerIdentity': {'principalId': 'A1PWI4M3I9Z57A'}},
                     'configurationId': 'NotificationObjectCreated',
                     'object': {'eTag': 'dd34b94d7a954d479febc35a819231b5',
                                'key': 'turdus_philomelos.jpg',
                                'size': 251073},
                     's3SchemaVersion': '1.0'},
              'userIdentity': {'principalId': 'AWS:AIDAJ22F5JNYL3GCHHM4O'}}]}
The import piece of information here is userIdentity': {'principalId': 'AWS:AIDAJ22F5JNYL3GCHHM4O'} which is related to the AWS user who uploaded the file.
Unfortunately you can’t currently get this user detail within the AWS User Console. However you can run the following code using Boto, the Python AWS library:
import boto
conn = boto.connect_iam()
user_id = conn.get_user().user_id
Once we have the user_id we can test it against the value in the message data. This is the reason we added the getUser policy to the IAM user, without it the code would throw an AccessDenied error.
On start-up the Python script uses the AWS API to learn it’s own user_id, it then can ignore messages about updates made by itself, and prevent any infinite loops.
Future work
This code is currently meant as a proof of concept and is not yet used in a production system. They are number of things I’d add before running in a production environment:
- Logging
- Error handling for corrupted input files
- Error handling of potential mozjpeg crashes
- Support for extra files types (png, gif, etc)
A future experiment could be to build on-top of these techniques to process the image files for alternative usages such as a facial recognition system using OpenCV.
This technique could be used to work with different types of file processing, it could be used for text file analysis, or to test SQL dumps are not corrupted.
I plan to do is enhance the code to use threading techniques to compress multiple files concurrently. This will be the subject of a future article.
If you'd lke to contact me about this article then use twitter @petexgraham or email articles@petegraham.co.uk.